Pages


Thursday, June 28, 2012

Baby Girl Quilt--Made with New Bosskut Gazelle Designs


The new Bosskut Designs just came out and it inspired me to make a baby quilt for a little girl. I used the bottle and the rattle for most of my blocks.  I added a baby face 
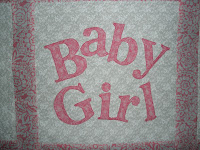
pattern I made up for one of the blocks. I made a second block that just said Baby Girl. I thought these two blocks would add a little to the other designs. I think that is why I love my Gazelle. I like to take what there is and then add my own touch—just like most crafters do. The whole idea is just to have fun!!! I love to have fun.  Below are some pictures of my new baby girl quilt. The quilt has been pieced but now needs to be quilted.
The Pieced Quilt
(Quilt top is now ready to be quilted)


Baby Bottle Block 


The Rattle Block


Baby Girl Block


Baby Girl Face Block


The "Baby Face" block I machine appliqued like the rest of the blocks. I hand embroidered the mouth, ears and eyes. The cheeks I did using a crayon technique I learned years ago. I take an applique transfer mat and lay my iron on it a few seconds. I then take my crayon and smear a little of the wax on the hot spot on the mat. I take a small piece of cotton fabric and rub it in the crayon. I then rub the color in the cheek area. Once I get it the consistency I want it I heat set it with my iron. I like to think of it as shading and highlighting on fabric. I think it adds a cute look.
I hope you liked this project and I hope it inspires you to get those scraps out and your Gazelle and start cutting.

Sunday, June 24, 2012

MY GAZELLE CARRY CASE

I like to take my Gazelle to crops and so I decided to make myself a tote to carry my

Gazelle. I wanted it to also hold the cords and cutting mats. I designed this tote and it seems

to work well for me. I also think it is cute, but then again I am partial.


Vinyl Projects Done With My Gazelle

My son recently bought a new used boat. He decided to name is boat for good luck. He named it “Triple Threat”—Boating, Gigging and Relaxing. With the use of my Gazelle I cut the name for his boat and this is the result. (Green Metallic on Black). Boat number I did just the opposite.


Sunday, May 6, 2012

Bosskut Gazelle Quilting: Suzy and Ronan's Quilts


I recently made my niece and nephew each a quilt. I make pillow shams, with their name on the pillow shams to match. My niece Suzy’s quilt pattern is called “Twister”. My nephew Ronan’s quilt pattern is called “Disappearing Nine Patch”, The pillow shams with their names on them were made with using my Gazelle. I think they turned out pretty nice.


This is an easy project to do on the Gazelle. Basically under “Text” you find the font you want to use. You type in how big you want the font to be and then spell their name. To do a layering effect you outline your letters and pick a different color from the first set of letters. You then are able to cut the main letters and then cut the outline of the letters. You layer your letters and then appliqué them to your fabric.

I hope you enjoyed this project.


Ode To My Wife The Quilter

Ode to My Wife the Quilter - Author Unknown

She learned to Quilt on Monday,
Her stitches all were very fine.
She forgot to thaw out dinner,
So we went out to dine.

She quilted miniatures on Tuesday.
She says they are a must.
They were quite lovely,
But she forgot to dust.

On Wednesday it was a sampler.
She says stippling's fun.
What highlights!  What shadows!
But the laundry wasn't done.

Her patches were on Thursday -
Green, yellow, blue and red.
I guess she was really engrossed;
She never made the bed.

It was wall hangings on Friday,
In colors she adores.
It never bothered her at all,
The crumbs on the floors.

I found a maid on Saturday.
My week is now complete.
My wife can quilt the hours away;
The house will still be neat.

Well, It's already Sunday.
I think I'm about to wilt.
I cursed, I raved, I ranted;
The maid has learned to QUILT !

Author Unknown

BOSSKUT GAZELLE QUILTING: EMS (EMERGENCY MUSIC SERVICES)


     EMS  (Emergency Music Services)

This is my most recent project. My sons have a friend that has a DJ service. The name of his business is EMS—Emergency Music Services. He asks me to create a table design for his DJ table. He came up with this design and what colors he wanted. He also wanted it to be shiny if possible.

I went shopping for fabric and ended up with some shiny fabric I had found at our local Wal-Mart. The shiny red and white are like a washable silk. The silver is actually spandex.  I ironed Heat n Bond on the back and used my Gazelle to cut it out. Now with Spandex you have to be careful because it really does not like heat. I only held the iron on it for a few seconds, just enough to get the heat and bond to stick. Too long, and it will damage the fabric and or melt it. It is really not to be meant to be ironed. But I had to try it anyway. It worked as you can see. It also can be washed on delicate and I would line dry this. All the fabrics I used said that on the tag. The black is a curtain he had purchased and wanted his insignia put on it. It too was tagged as delicate wash.


Wednesday, March 28, 2012

BOSSKUT GAZELLE QUILTING--BATMAN QUILT

BOSSKUT QUILTING - BATMAN QUILT by Janet R


This Batman quilt is my newest quilt design. A friend of mine has a nephew named Joel. Joel loves Batman. My friend and I were on a quilt shop hop when we ran across a Batman Panel. The little quilt shop also had some coordinating fabrics which we also purchased. I volunteered to make Joel a quilt with the fabrics we purchased.
I might add that having a Gazelle makes designing very easy, as you will see. I began searching the internet and came across some coloring book pages with a Batmobile (Kids and Fun) and the Batman Signal (printer kids). They were free to download for children to color. In this case I downloaded them and vectorized the pages.
The first thing I do is iron on my Pellon 805 to the back of my fabric.


I then place it on my mat and with a roller I roll out the bubbles and wrinkles. I am then ready to stick the cutting mat in the Gazelle and begin cutting.


The bat mobile after I vectorized it was ready to draw and cut. I first had the Gazelle draw the bat mobile in the Funtime Software, using a white chalk pencil which I purchased at the quilt shop. Out of all the disappearing pencils I had purchased this one worked well on the black fabric. I want to also say that it started off drawing real well but as it drew the design the chalk began to fade. Once it faded and was very light I pushed my red button on the Gazelle and stopped the machine. I then took the pencil out and sharpened it and placed it back into the Gazelle. It is important not to move the plotter as you take the pencil out and then replace it. I then pushed the red button and the Gazelle finished drawing the design. I have never had to do this but I think with the pencil being chalk that it wore down before the design was finished. Some pencils do better than others.
Once the Bosskut Gazelle had drawn the bat mobile, I then placed the blade in without moving the plotter and then I had the Gazelle cut around the Bat mobile.
The picture above shows the Bat Mobile after the Gazelle had drawn the design. I then had the Gazelle cut around the Bat Mobile. This is what it looked like once I removed the extra fabric from the cutting mat.
Once I had it cut out I then ironed it onto my fabric and with silver metallic thread (Coats and Clark) I sewed a straight stitch on the pencil markings. Here is the finished results.
I must say here that I had sewed it on this light blue fabric but then changed my mind and decided to sew it on the batman fabric instead because I did not like the light blue fabric. I basically cut around this fabric and then appliquéd it to the batman fabric.
The bat signal was a coloring book page. I downloaded it and vectorized it with my Funtime. The Gazelle first cut the yellow oval. I then programmed it to cut out the black oval and the batman signal.
I then ironed the black pieces on the yellow and appliquéd them to the quilt.
The scene at the bottom I basically just used the drawing of different figures (circle, square, rectangle, and arrow) to draw a silhouette of St. Louis, since we live in Missouri. I figured Batman must look out for us here in Missouri. I also used the house design (which came with our gazelle under shapes, click on general. You will see the house). I basically made four of them and placed them together and welded them and then the gazelle cut them out. That shape is to the left of the arch. I also downsized my bat mobile and made a little version for on the road. The Gazelle had cut out the windows in the buildings and I just stuck a yellow piece of fabric behind the fabric before I appliquéd it down. This made it look like the lights were on in the building.
Well the top of my quilt is done so it is off to the quilters I must go. I will try and post a finished picture of the quilt when it comes back from the quilters.
I had great fun designing this quilt and I hope little Joel likes it to. Joel loves to see his name on items so I downloaded a Batman Font and added his name to the top.
Thanks for taking your time to view my latest creation!
Janet Rankin – Bosskut Design Team


Saturday, March 17, 2012

BOSSKUT GAZELLE QUILTING--SUNBONNET SUE QUILT


Sunbonnet Sue Quilt


I made this quilt for a friend of mine. I had bought a book with the pattern in it, from Joann’s Fabrics. Sunbonnet Sue is a pretty easy pattern to find. You can find it in any quilt or fabric store. It is also an easy pattern to start with.
I scanned the pattern and imported it into Funtime and then vectorized the file. From there I was then able to cut my pattern pieces with my Gazelle. I did not need to resize the pattern or make any adjustments since the pattern was the size I wanted.
On the back of every piece of fabric I iron a piece of Pellon to the back side of the fabric. This makes it easier to cut the fabric with my Bosskut Gazelle. It also helps hold your fabric pieces in place while you applique the pieces to your quilt block.
Once you have your pieces cut, the next step is to layer your pieces on your quilt block. Once, you get your pieces where you want them, you can then iron them in place. I then machine appliqued the pieces in place. Below is the end result.


 One of the quilt blocks up close.

Thank you for looking!

Janet Rankin - Bosskut Design Team Member